- July 7, 2021
- A2K WordPress
- 0
10 Revit Tips and Tricks Every User Should Know
- Blake Vaughn – BIM Manager (BIM/VDC)
- July 08, 2021
10 Revit Tips and Tricks Every User Should Know
Are you looking for Revit tips for your project? There’s a saying that “A tool is only as good as the hand that wields it.” This fundamental truth is core to the BIM industry. Revit is one of, if not the most powerful tools in the BIM industry — but how skilled are you with it? Whether you are a new user or a seasoned Revit engineer, there is always room for improvement in how we utilize this incredible tool. Here are 10 tips and tricks EVERY Revit user should know to simultaneously improve modeling efficiency and accuracy.
1. Organize Your Workspace
Depending on the size and number of monitors you have, you may have to get creative with how you lay out your palettes and views. There is no right or wrong spot for your properties palette and project browser, but you want to have as many of these panels visible to minimize unnecessary scrolling. Some people like to move their palettes to a second monitor, while others prefer to stack their palettes and cycle through them using tabs. Regardless of what layout you choose, make the workspace efficient for you.
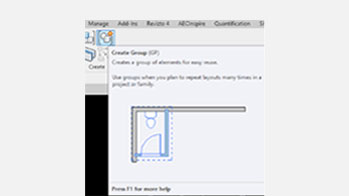
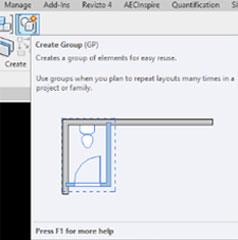
2. Let Revit Teach You
I’ve been using Revit for nearly 15 years, and I’ll admit that there are still some tools in Revit that I didn’t know existed. Even for the tools that I knew about, I later found out that I was not using them as efficiently as I could have. A quick way to learn what any button does is to hover your mouse over the top of the button and read the tool tip description. Some tool tips even have a tutorial video you can watch. If you like what you see and want to learn more, just hit the F1 key and the Help menu will open to the page with more information about that specific tool.
3. Read Warning and Error Messages
We’ve all been frustrated with Revit at some point. For example, have you ever tried to click to place an element and it doesn’t show up in your view? Maybe you tried placing it several times but the only thing that happens is the pesky yellow warning bubble popping up, and you can’t proceed until you click the “X” button to close it.
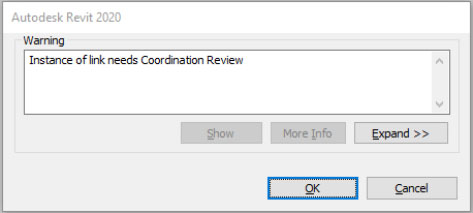
This particular warning message is actually one that may require some action on your part. For instance, this message is trying to tell you that something you are copying/monitoring has changed, and you need to review the discrepancy and tell Revit how to handle it. Perhaps the design model you’re copying/monitoring grid lines from, has moved a gird line. Revit won’t update copy/monitor elements automatically, it patiently waits for you to tell it how to address the issue.
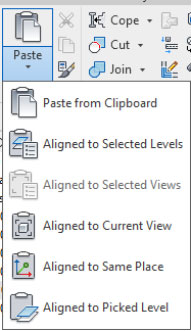
4. Copy/Paste Methods
Copy & Paste are some of the first commands every Revit user learns, but did you know that there are multiple ways to copy and paste content? The “CO” keyboard command works for most things we need to copy, but if you copy content using “Ctrl+C”, you now have a few more options available to you. To If you’re copying elements or annotations from one view to another, these Paste options are extremely useful to make sure content is aligned from one view to the next.
5. Filter Selections
Some of the most efficient Revit users I’ve ever seen are not necessarily the fastest modelers. Meanwhile, being efficient means achieving a goal or accomplishing a task in the fewest steps possible. In Revit, this equates to performing a task in the least amount of clicks/keyboard strokes possible. Some of the most time-consuming tasks in Revit are selecting multiple elements and modifying their properties and parameters. To help with this, Revit provides several options to hide, isolate and filter for specific objects.
6. Pinning Links and Elements
Selecting elements by drawing a window sometimes grabs elements that you weren’t intending to select. A great habit to develop is pinning links and elements that you don’t want to accidently move around. If an element is pinned, you can still select it and copy it but if you don’t want to even select the element, turn off “Select Pinned Elements” with this button on the bottom of your screen:
7. Keyboard Shortcuts
Many efficient Revit users will model with one hand on their mouse and one hand on the keyboard. If you come from an AutoCAD background, this is how almost all speed-drafters operate. These hand positions allow you to constantly select/pan/etc. while starting commands using the keyboard instead of navigating the tabs and panels to find the tool you need. Some Revit commands have preset keyboard shortcuts, but most do not. In the Options dialog box, you have full reign to assign keyboard shortcuts to any Revit command you would like.
I suggest sticking to shortcuts close to what the command name is, rather than assigning your most frequently used commands to letters or making only slight changes to existing keyboard shortcuts. For example, I change my EX command from Extrude (Revit default) to Extend/Trim Multiple Elements, or “CC” for Copy instead of “CO” (I always miss the O when I’m trying to type the command with just my left hand).
| Preset Shortcuts | Suggested Custom Shortcuts | Object Snaps | |||
| MM | Mirror | CC | Copy | SC | Snap Center |
| DM | Draw Mirror Line | NWC | Export to NWC | SM | Snap Midpoint |
| RO | Rotate | DWG | Export to DWG | SE | Snap Endpoint |
| R3 | Rotate, pick origin | EX | Extend/Trim Multiple | SI | Snap Intersection |
| CN | Conduit | SN | Snap Nearest | ||
| CT | Cable Tray | SP | Snap Perpendicular | ||
| OF | Offset | SQ | Snap Quadrant | ||
| Spacebar | Flip/Rotate Element | ||||
| Enter | Repeat Last Command | ||||
8. Using Dimensions to Move Elements
When you click on an element in Revit, you will almost always see temporary dimensions pop up that show the distance between the selection and a nearby wall or another Revit element. These can be helpful in controlling how far elements need to move. Temporary or permanent dimensions can help the Revit user have more control moving elements than dragging the element with the mouse or using the arrows on the keyboard to nudge the element. Make sure to emphasize these temporary dimensions edits to move elements, to improve efficiency.
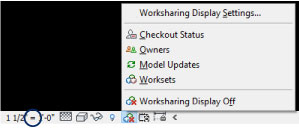
9. Worksharing Display Options
When worksets and Worksharing is enabled on a project, you’re able to work with multiple users simultaneously in the same model. This adds another level of complexity within a project, but using the Worksharing Display Options can help make this workflow smoother.
One of the biggest struggles with using worksets is staying organized. When copying elements, Revit puts the new elements on the current workset rather than the same workset as the original elements. To help visualize the worksets and element ownership, you can apply color filters using the Worksharing Display Settings. Therefore, this makes it easier to see who created or modified an element last and which worksets the various model elements are on.
10. Design Options
Design Options allows you to explore alternative design options within your model. You can set up multiple options for different parts of the model, all within the same project. Using Design Options makes it easier to review and analyze options and makes implementing the final selection as easy as a couple clicks of the mouse. It will be beneficial for users to familiarize with how to create option sets and add options to sets, combined with Visibility Graphics to improve efficiency.
In conclusion, these are some valuable Revit tips to consider for your next project.